Friday, November 30, 2007

Vegetarian Chili with Green Beans

Veggie Chili was always a staple in my house growing up. We may not have had meat, but you know I've sung the praises of morningstar farms more than once, and chili brought out the best in MF's "veggie crumbles." Yea yea, it sounds really unappetizing, but trust me, it's amazing. Obviously if you're not restricted by vegetarianism, feel free to add all the BOEUF you desire. Morningstar will come through for the rest of us.

As usual, this falls somewhere between method and recipe. My standard veggie chili has garlic, onion, tomatoes, peppers, morningstar, white beans, and spices. This one had all of the above except no white beans -- I only had black beans in the house. I also added a bit of sweet potato, since I had some baked, mashed, and in the fridge. I'd do that again in a flash: the sweet potato added subtle sweetness and earthiness to an otherwise typical Mexican veggie chili. Finally, I threw in some green beans and a bit of spinach at the very end, which made this chili a one-pot meal. Pop it on some whole wheat tortillas, and you've got dinner! Oy, I feel like Rachel Ray...


Veggie Chili with Green Beans
serves 2

1 jalapeno pepper
1/2 onion ( I used red, any will do), chopped
3 cloves garlic, peeled and chopped
1 package morningstar farms veggie crumbles OR 1/2 lb. ground turkey or beef
1 8 oz. can diced tomatoes
1 sweet potato, chopped and baked
1 1/2 cups green beans
1 cup spinach, chopped
1 green pepper

1 tsp. chili powder
1/4 tsp. crushed red chilies
1/2 tsp. cumin
1 tsp. coriander
a few springs of fresh cilantro
salt and pepper to taste

  1. In a heavy-bottomed pan, saute onions, garlic, and jalapeno in 2 Tbsps. olive oil.
  2. When onions are fragrant and soft, add veggie crumbles or meat, a bit more oil if needed, and all spices except cilantro, plus salt and pepper to taste. saute until thawed and/or browned.
  3. Add tomatoes, and toss to coat everything with their juices.
  4. Add sweet potatoes, green beans, and spinach, and continue to cook over medium heat until green beans are soft, about ten minutes.
  5. Finish with chopped fresh cilantro; serve with whole wheat tortillas. Enjoy!
Read more!

Wednesday, November 28, 2007

Pay it Forward


Believe it or not, there are a gazillion blogging events out there. From Daring Bakers, to "waiter, there's something in my..." to "heart of the matter" to ... gosh, they never end!


That said, I've found the event to end all events: Pay It Forward!


Here's how it works: I will send a handmade gift to the first 3 people who leave a comment on my blog requesting to join this PIF exchange. I don’t know what that gift will be yet and you may not receive it tomorrow or next week, but you will receive it within 365 days, which is my promise! I also promise that it will be (at least partially) edible, and most definitely tasty. The only thing you have to do in return is "pay it forward" by making the same promise on your blog. Make sure you leave me an email address so that I can get your handmade surprise to you!

Now that that's done, please do yourself a favor and buy the scrumptious chocolates from Ghirardelli pictured above.. The bottom layer is chocolate, the top layer is white chocolate studded with peppermint bark....OH MY GOD they're amazing! All kudos to Meryl and Benjy for making these a part of my life.

Ok, enough from me. :)
Read more!

Tuesday, November 27, 2007

Indian, round 1: Potato and Eggplant Curry


I know, I know. "Indian food? Scary!" But really, it's not all that scary. Not if you have an endless list of totally obscure ingredients you've never heard of in quantities much larger than you'll ever need, from the grocery store that's farthest and most inconvenient to the rest of your life.

See? Not so bad.

Today I had a car, and I made sure to take extra-long at my doctor's appointment. Read: I went to the Indian grocery store way the hell down Rockville Pike. I actually thought I'd missed it, and just as I sent a text to google asking where in the world "International Indian Supermarket" was (yea, that's what it's called. It's Indian and International), I found the IHOP, turned left, and there, on the side of the pancake house, was a small slice of Indian heaven. Think curry leaves, dried papadum, dosai mix, whole nutmeg and turmeric and amchur (huh?) and lots of frozen dinners. Daunting? A little, but also ridiculously fun. I was a kid in a candy store. Only I didn't recognize any of the candies. But still, candy store, people.

Here's what I came home with:

1 package toor dal
1 package whole nutmeg
1 package brown sesame seeds
1 tub tamarind paste (crack, as far as I'm concerned. This stuff is amazing.)
1 jar garam masala paste
garam masala and chana masala powders
1 bag curry leaves
1 bag dried papadum
1 box dosai mix
1 large box saffron

True to form, I used only four of the above ingredients in the curry I made tonight, and I used them in proportions that an Indian food connoisseur would poo-poo. And by that, I mean that I made it all up.

But hey, it was edible! In fact, it was so edible that even D ate it. And when it came time to take seconds, she chose my odd creation over the palak paneer (spinach and cheese) from a package. So it really must have been pretty decent.

I'll happily provide the recipe here, but as with most things I make, this "recipe" never really was a recipe as much as a taste-and-adjust experiment. The moral of the story is to always try new things, especially Indian food, because with Indian food, all the flavors on the plate are supposed to blend together -- so if you accidentally over or under-season something, just mix it with something else until it tastes like something you want to eat. Kapish?


Potato, Yam and Eggplant Curry
serves 2, with leftovers.

2 large potatoes of any sort (I used regular old baking potatoes), in chunks
1 sweet potato, in chunks
1 small eggplant (I used most of one Japanese eggplant), in chunks
1/2 a tomato, diced
1/2 a red onion, diced
2-3 small curry leaves
1 1/2 tsp. garam masala paste
1 Tbsp. tamarind paste
1 Tbsp. sugar
peanut oil (veg. oil is fine)
salt to taste

  1. Add 1/3 cup peanut oil to a heavy-bottomed pan. Add garam masala paste, curry leaves and diced red onion. Saute until translucent.
  2. Add potatoes, and toss to coat with seasoning. Saute five minutes.
  3. Add eggplant, and toss to coat. Saute 2 minutes.
  4. Add water by the cupful (I added about two cups), until curry stops sizzling. The idea here is to bring the water to a low boil, and allow it to cook of gradually. This will create a sauce with concentrated flavor, and it will also allow the potatoes to cook through.
  5. When the first round of water is mostly evaporated, add a cup or two more and keep cooking. Continue this process until potatoes are easily pierced with a fork; then allow the water to boil down to a thickened sauce.
Raita
makes 1 cup.

1 cup yogurt
1 tsp. salt
2 Tbsp. finely diced onion
finely diced cucumber and carrot, optional

Combine the above ingredients and serve as a condiment. It offers some relief from the heat (temperature) and heat (spice) of the curry. Read more!

Monday, November 26, 2007

Gauging Interest...


A hypothetical situation:

If I were to make wall calendars with pictures and (possibly) funny musings from my blog and photo archive, would you be interested in buying one at around 15-20 bucks a pop?

Post a comment on this post if you're interested...
Read more!

Daring Bakers' Potato Bread!


The long-awaited day has arrived! I am officially a Daring Baker (see the logo and info on the right side panel). Daring Bakers is a baking group, started by two bloggers, Lis of La Mia Cucina and Ivonne of Cream Puffs in Venice, just over a year ago. Since then, it's grown astronomically. There are hundreds of DBers, and the group is still growing. Here's how it works: every month, our host chooses a recipe. We all make that exact recipe, schmooze with each other about our experiences, and then we all post the recipe on the same day. To check out some of my favorite fellow DBers, check here, here and here.

Anyhow, this month's recipe was for "tender potato bread." It comes from a fantastic book called "Home Baking: the Artful Mix of Flour and Tradition Around the World." Now, if you're like me and you just thought of tasteless ghetto food, think again. Potatoes are a shockingly good dough ingredient. Once their boiled and mashed, as the recipe describes, they become light and tender; the dough, which contains lots and lots of potatoes, is almost as fun to play with as oobleck was in second grade. So fun, in fact, that I had to remind myself I was making bread; over-kneading results in a tough loaf. Some people complained that the dough was too soft and hard to work with; actually really enjoyed how easy it was to work with. I added flour by the half-handful, until I hit almost 8 cups, at which point it was perfect. I added more after the first rise, and by the time it was ready, my dough wasn't too sticky to shape.


If you're a loyal NDP reader (and boy, I hope you are!) you've surely noticed my inexcusable but unapologetic laziness when it comes to precision, consistency, and other recipe-related adjectives. I don't like recipes and I rarely follow them to the letter: stay tuned for my next blog post, which will elaborate why this seemingly irresponsible and lazy way of cooking is actually ideal.) However, the rules of Daring Bakers clearly state that no alterations are to be made to the month's recipe unless allergies or other equally valid reasons prevent a baker from following the recipe. I'm pretty sure laziness doesn't count as a valid reason in the DB rule book, so ladies and gentlemen, I actually did what the recipe said to do, all the way to the end.

The result?

Delicious, tender-when-warm but perfectly-crusty rolls, and a not-as-stellar but still-completely-acceptable loaf. The crust is perfectly thick and crunchy, the innards glutinous but not overly dense, and the flavor rustic. Is your mouth watering yet?

It is imperative that you eat one of the rolls right out of the oven; as Mario Batali said, "hot, it's a whole other ballgame." They go really well with jam, butter, pesto and more -- you name it.


I did alter the recipe a bit to add some zing: I boiled and mashed one garlic clove along with the potatoes, which I'd definitely do again (maybe even add a second one); I added a dash of chili powder and a Tbsp of buckwheat honey to the dough before the first rise, and a teaspoon of chopped fresh rosemary before the second rise. The flavors are subtle, but the buckwheat honey and rosemary really come through. I will most certainly be making this again. Thanks so much to Tanna and DB for broadening my bread horizons! :)

Tender Potato Bread
from "Home Baking: the Artful Mix of Flour and Tradition Around the World"
Ingredients:

4 medium to large floury (baking) potatoes, peeled and cut into chunks.
Tanna's Note: For the beginner bread baker I suggest no more than 8 ounces of potato; for the more advanced no more than 16 ounces. The variety of potatoes you might want to use would include Idaho, Russet & Yukon gold, there are others.

4 cups(950 ml) water, reserve cooking water
1 tablespoon plus 1 teaspoon salt
2 teaspoons active dry yeast
6 ½ cups to 8 ½ cups (1 kg to 1350g) unbleached all-purpose
1 tablespoon unsalted butter, softened
1 cup (130g) whole wheat flour

Making the Dough (Directions will be for making by hand):

Put the potatoes and 4 cups water in a sauce pan and bring to boil. Add 1 teaspoon salt and cook, half covered, until the potatoes are very tender.

Drain the potatoes, SAVE THE POTATO WATER, and mash the potatoes well. Tanna Note: I have a food mill, so I will run my potatoes through to mash them.

Measure out 3 cups(750ml) of the reserved potato water. Add extra water if needed to make 3 cups. Place the water and mashed potatoes in the bowl you plan to mix the bread dough in. Let cool to lukewarm (70-80°F/21 - 29°C) – stir well before testing the temperature – it should feel barely warm to your hand. You should be able to submerge you hand in the mix and not be uncomfortable.

Add yeast to 2 cups all-purpose flour and whisk. Add yeast and flour to the cooled mashed potatoes & water and mix well. Allow to rest/sit 5 minutes.

Note about Adding Yeast: If using Active Dry Yeast or Fresh yeast, mix & stir yeast into cooled water and mashed potatoes & water and let stand 5 minutes. Then add 2 cups of flour to the yeast mix and allow to rest several minutes. If using Instant Dry Yeast, add yeast to 2 cups all-purpose flour and whisk. Add yeast and flour to the cooled mashed potatoes & water and mix well. Allow to rest/sit 5 minutes.

Sprinkle in the remaining 1 tablespoon salt and the softened butter; mix well. Add the 1 cup whole wheat flour, stir briefly.

Add 2 cups of the unbleached all-purpose flour and stir until all the flour has been incorporated.
Tanna Note: At this point you have used 4 cups of the possible 8 ½ cups suggested by the recipe.

Turn the dough out onto a generously floured surface and knead for about 10 minutes, incorporating flour as needed to prevent sticking. The dough will be very sticky to begin with, but as it takes up more flour from the kneading surface, it will become easier to handle; use a dough scraper to keep your surface clean. The kneaded dough will still be very soft. Place the dough in a large clean bowl or your rising container of choice, cover with plastic wrap or lid, and let rise about 2 hours or until doubled in volume.

Turn the dough out onto a well-floured surface and knead gently several minutes. It will be moist and a little sticky.

Forming the Bread:
Tanna Note: It is at this point you are requested to Unleash the Daring Baker within. The following is as the recipe is written. You are now free to follow as written or push it to a new level.

Divide the dough into 2 unequal pieces in a proportion of one-third and two-thirds (one will be twice as large as the other). Place the smaller piece to one side and cover loosely.

To shape the large loaf:
Butter a 9 x 5 x 2.5 inch loaf/bread pan. Flatten the larger piece of dough on the floured surface to an approximate 12 x 8 inch oval, then roll it up from a narrow end to form a loaf. Pinch the seam closed and gently place seam side down in the buttered pan. The dough should come about three-quarters of the way up the sides of the pan. Cover with plastic wrap and let rise for 35 to 45 minutes, until puffy and almost doubled in volume.

To make a small loaf with the remainder:
Butter an 8x4X2 inch bread pan. Shape and proof the loaf the same way as the large loaf.

To make rolls:
Butter a 13 x 9 inch sheet cake pan or a shallow cake pan. Cut the dough into 12 equal pieces. Shape each into a ball under the palm of your floured hand and place on the baking sheet, leaving 1/2 inch between the balls. Cover with plastic wrap and let rise for about 35 minutes, until puffy and almost doubled.

To make focaccia:
Flatten out the dough to a rectangle about 10 x 15 inches with your palms and fingertips. Tear off a piece of parchment paper or wax paper a little longer than the dough and dust it generously with flour. Transfer the focaccia to the paper. Brush the top of the dough generously with olive oil, sprinkle on a little coarse sea salt, as well as some rosemary leaves, if you wish and then finally dimple all over with your fingertips. Cover with plastic and let rise for 20 minutes.


Baking the bread(s):

Note about baking order: bake the flat-bread before you bake the loaf; bake the rolls at the same time as the loaf.

Note about Baking Temps: I believe that 450°F(230°C) is going to prove to be too hot for the either the large or small loaf of bread for the entire 40/50 minutes. I am going to put the loaves in at 450°(230°C) for 10 minutes and then turn the oven down to 375°F (190 °C) for the remaining time.

Note about cooling times: Let all the breads cool on a rack for at least 30 minutes before slicing. Rolls can be served warm or at room temperature.

For loaves and rolls:
Dust risen loaves and rolls with a little all-purpose flour or lightly brush the tops with a little melted butter or olive oil (the butter will give a golden/browned crust). Slash loaves crosswise two or three times with a razor blade or very sharp knife and immediately place on the stone, tiles or baking sheet in the oven. Place the rolls next to the loaf in the oven.

Bake rolls until golden, about 30 minutes. Bake the small loaf for about 40 minutes. Bake the large loaf for about 50 minutes.

Transfer the rolls to a rack when done to cool. When the loaf or loaves have baked for the specified time, remove from the pans and place back on the stone, tiles or baking sheet for another 5 to 10 minutes. The corners should be firm when pinched and the bread should sound hollow when tapped on the bottom.

For foccacia:
Place a baking stone or unglazed quarry tiles, if you have them, if not use a no edged baking/sheet (you want to be able to slide the shaped dough on the parchment paper onto the stone or baking sheet and an edge complicates things). Place the stone or cookie sheet on a rack in the center of the oven and preheat to 450°F/230°C.

If making foccacia, just before baking, dimple the bread all over again with your fingertips. Leaving it on the paper, transfer to the hot baking stone, tiles or baking sheet. Bake until golden, about 10 minutes. Transfer to a rack (remove paper) and let cool at least 10 minutes before serving. (Levitating bread!)

Levitating Bread!

Read more!

Sunday, November 25, 2007

How was your Tday?


Mine was wonderful. We spent the morning hours curled up on the couch, watching the parade and drinking chai. We stopped being lazy in time to have meal #1 with my friend and her family at 2 pm. Don't be deceived by the early hour: they had the largest Turkey I've ever seen, stuffed with challah stuffing and accompanied by flawless sweet potatoes, giblet gravy, cranberry and gooseberry sauces, and many more things than I can name. A little bit of everything was the only way to go -- but when pie time came, it was hard to hold back. Mrs. Sorel's pecan pie was perfectly creamy without being too gelatinous; it was the best I've ever had.


After that, we headed over to my parents' house for Tday meal #2, equally delicious and entirely vegetarian. I took way too much delicata squash, cranberry stuffing, wine-braised shallots, cranberry-jalapeno chutney, mushroom-chestnut hash, and (again) other things I can't think of at the moment. Jeez, talk about excess... and of course, we saved room in our already-full stomachs for pumpkin, pecan, and apple-cranberry pies with fresh whipped cream. We also may have taken half a pie home with us. It's all gone now.


Lessons learned: one Tday meal is really, really more than enough. Two Tday meals? Whoa.

Hope you all had a restful and filling T-day weekend. Back to the grind... Read more!

Tuesday, November 20, 2007

Chocolate Souffle, much improved!

Ghirardelli in the double boiler, egg whites in the mixer, and D asking for Duncan Hines yellow cake to no avail...it all can only mean one thing: chocolate soufflé. That's right folks, I'm at it again.

Major differences between my first attempt and this recipe were the amounts of egg whites, milk, cream, and chocolate. Specifically: for the same amounts of butter, sugar, and egg yolks, recipe 2 had half the cornstarch, double the egg whites, 3x the chocolate, no cream, and 5x the whole milk instead. Yes, obviously the more chocolate, the better; but I'd also guesstimate that less cornstarch means less cake-y; more egg whites means lighter; more whole milk and less cream, again, lighter. In short, this is the kind of soufflé I've been craving all along. And hey, it only took one mess-up to hit the jackpot!

I was a bit concerned that when I was ready to fold in the egg whites, the chocolate mixture was still warm. (If you add egg whites to a warm batter, the air that you've whipped into the whites can quickly escape, leaving you with flat, heavy batter.) However, my fears did not materialize, and the soufflé held its volume quite nicely. The result was light, fluffy, warm, and ever so sinfully chocolate-y. So to all those who think souffle is this uber-delicate little gem never to be tampered with, ha! It can handle the heat.
Truthfully, people. There's almost nothing like taking the first bite out of a chocolate soufflé and watching the rest "relax" in the ramekin. Try it yourself; it's not as hard and scary as you might think. And, if it's not clear from my enthusiasm, the results are worth one or two mess-ups.

Chocolate Souffle
from Epicurious
serves 6.
  • 1 tablespoon unsalted butter, softened
  • 10 1/2 ounces (10 squares) extra-bittersweet chocolate
  • 1 1/3 cups whole milk
  • 1 tablespoon cornstarch
  • 3 large egg yolks, room temperature, lightly beaten
  • 6 large egg whites, room temperature
  • 1/3 cup sugar; more for soufflé ramekins

1. Heat oven to 400 degrees. Butter and sugar six 6-ounce soufflé ramekins. Place on a rimmed baking sheet; set aside.

2. In a double boiler over medium heat, melt the chocolate until smooth. Remove from the heat and keep warm. (I found I had to stir it around with a fork every so often to keep it from getting chunky, but that will depend on your chocolate. The higher percentage of cocoa, the more you may need to stir.)

3. In a medium heavy-bottom saucepan combine milk and cornstarch. Stir well with a wooden spoon to combine. Bring the mixture to a boil over medium heat, stirring continuously, until thick.

4. Remove milk mixture from the heat, remove any skin that may have formed on top, and stir in warm melted chocolate. Let cool slightly. Add a bit of this mixture to the egg yolks to temper them, then add the lightly beaten egg yolks back into the milk mixture and stir until well combined.

5. In the bowl of a heavy-duty mixer, whip egg whites on medium speed until soft peaks form. Slowly add sugar and increase speed to high. Whip until shiny and stiff peaks form, about 3 minutes.

6. Using a whisk, lighten the chocolate mixture with about 1/3 of the beaten egg whites. Stir until well-combined. Using a large rubber spatula, fold in remaining egg whites until just incorporated.

7. Spoon mixture into prepared souffl
 ramekins; the mixture should come up to the top of the ramekin. Transfer filled soufflé ramekins on rimmed baking sheet to oven. Bake until risen, 12 to 15 minutes. Serve immediately.
Read more!

Sunday, November 18, 2007

A Very Vegetarian Thanksgiving


Having spent 22 Thanksgivings with my family, I've seen my fair share of crowded dinner tables, overstuffed tummies and packed fridges. This year will be no exception. As promised, the array of dishes that my mom and I made for Thursday's feast is so vast, turkey simply will not be missed. We planned a menu with something for everyone (and too much for any one person) to eat. Below, I've outlined every step of our process, complete with shopping lists, directions, and substitutions for those with allergies or dislikes. I hope this comes intime for your prep, and as always, I'd love any and all feedback on recipes, readability, etc. Happy shopping, cooking, and eating!


SHOPPING LIST


Squash Stuffed With Red Quinoa, Pears and Cranberries

  • 1 red onion
  • 2 firm pears, any kind will do
  • 1 stalk celery
  • ¼ cup pecans
  • 1 bunch fresh thyme
  • 1 small container apple juice (total ½ cup)
  • 1 small container vegetable broth (total 2 cups)
  • 4 delicata squash, depending on size, or substitute butternut squash
  • 1 box red quinoa; can substitute regular quinoa or wild rice

Jalapeno-Fruit Chutney

  • 2 jalapeno chilies
  • 1 package dried apricots
  • 1 package cranberries
  • small package crystallized ginger (total 1 Tbsp)
  • white and brown sugar (total ½ cup of each)
  • cloves, cinnamon, allspice, nutmeg – whichever you have

Cornbread Broccoli Rabe Strata

Note: we made half a recipe, in a square pan; we’re guessing people will love this, but they’ll only take one helping. It’s pretty rich!

  • olive oil
  • 1 head garlic (you’ll only need 1 clove for this)
  • crushed red pepper flakes
  • 1 lb. broccoli rabe, or rapini -- those big leaves with what look like little broccoli florets
  • 1 red pepper
  • 1 small container kalamata olives (total ¼ cup)
  • 1 quart whole milk
  • 8 eggs
  • whatever you need to make cornbread – we do from scratch, but there are easy mixes out there as well
  • 1 container ricotta cheese OR farmer cheese (we did farmer cheese, and prefer it)
  • 1 block gruyere cheese (6 oz. total)

Mushroom Soup

  • 1 ½ lbs. mushrooms of any kind (we used a mix of white, baby bella, cremini, chanterelles and shitake. If you’re on a budget, use baby bella and cremini, which run much cheaper than chanterelles and shiitake.)
  • 8 cups of broth (we bought two cartons of no-chicken broth, which was perfect)
  • 5 shallots
  • 2 cloves of garlic (one head of garlic will suffice for all the recipes we made)

Squash Stuffed With Red Quinoa, Pears and Cranberries
Quinoa adapted from “Cranberry Pear Wild Rice Stuffing” by Nava Atlas, chutney adapted from this recipe in delicious living magazine
Serves 8-12.

Red Quinoa:

    • 2 cups vegetable broth or no-chicken broth
    • 1 box red quinoa (approximately 2 cups)
    • 1 red onion, diced small
    • 1 celery stalk, diced small
    • 2 medium firm pears, cored and diced
    • ½ cup dried cranberries
    • ¼ cup finely chopped pecans or walnuts
    • 1 tsp. fresh thyme (can substitute ½ tsp. dried thyme)
    • ½ cup apple or pear juice
    • 4 delicata squash, or substitute butternut

Fruit Chutney:

    • 1 cup dried apricots
    • 1 ½ cups water
    • ½ tsp cinnamon
    • 1 Tbsp. crystallized ginger, chopped
    • ¼ tsp. cloves
    • ¼ tsp. allspice
    • 1 package cranberries
    • 2 jalapeno peppers

For the Quinoa:

  1. Bring the broth to a simmer in a saucepan over medium heat. Stir in the quinoa and cook according to the directions on the package. (We cooked ours over medium heat for ten or so minutes, then turned off the heat and let it steam the rest of the way.)
  2. Once the heat has been turned off, add the diced pears and cover the pot, allowing them to par-cook with the quinoa.
  3. Meanwhile, sauté onion and celery in a couple Tbsp of olive oil over medium heat, until soft and translucent. Add thyme, and continue to sauté. (Here’s the truth: we let the onion and celery go on a bit too long, and it got a bit charred…and delicious. I highly recommend charring the onion and celery!)
  4. Add the cranberries, onion/celery/thyme, pecans and apple juice to the cooked quinoa, and toss. If needed, add salt and pepper.

For the Squash:

  1. Slice squash lengthwise, and remove seeds. (If you save them, you can prepare them this way.)
  2. Roast squash, upside down, in a pyrex with an inch of water in the bottom. For delicate, 30 minutes is plenty; butternut need about an hour. Remove squash from the oven when you can easily pierce their flesh with a fork.
  3. Fill the crevices of the squash with the red quinoa filling.

For the Fruit Chutney:

  1. Bring 1 ½ cups water to a boil and pour it over the apricots in a small bowl. Leave for ten minutes; this will reconstitute the apricots. Keep the liquid when done!
  2. Meanwhile, roast the jalapeno peppers under the broiler until the skin blackens and develops blisters, 10-15 minutes. (If you have a gas stove, you can char them over an open flame much more quickly.) Remove them from the oven and insert them into a brown paper bag. Allow them to steam in the bag for 5 minutes, then remove them and slide their skins off under running water. Chop them into a fine dice; they should total about 2 Tbsp.
  3. Into a pot on medium heat, add apricots, jalapeno, cranberries, crystallized ginger, spices and the leftover liquid from the apricots plus enough extra water to total 1 ¼ cups. Allow all of the ingredients to simmer until cranberries start to pop and the mixture gels, about 15 minutes. Remove from the heat, and allow the chutney to set.
  4. Top squash and quinoa with a dollop of the chutney, and serve some alongside as well.

Alternative recipe:
Add chickpeas to the quinoa, and mix in some salsa with the fruit chutney for a more savory topping.

Mushroom Soup
Adapted from this recipe on Epicurious


  • 1 ½ lbs. assorted mushrooms
  • 5 shallots, diced
  • 5 cloves garlic, chopped
  • 3 Tbsp. olive oil
  • 6 cups broth
  • salt and pepper as needed


  1. Rinse or wipe mushrooms clean, then pat dry; chop roughly into two or three pieces each. Save two or three mushrooms, which you can later chop and use as a garnish.
  2. Sauté shallots and garlic in olive oil until soft and translucent.
  3. Add mushrooms and sauté over medium-low heat until mushrooms start to emit liquid, about 10 minutes.
  4. Add half the broth, and allow to simmer for 15 minutes.
  5. Remove mushrooms and shallot pieces with a slotted spoon and put into a food processor. Puree them with 1 cup of broth until smooth. Return to the pot, add the rest of the broth, and simmer 15 more minutes. Remove from heat.
  6. Serve warm, with mushroom garnish.
We also made:
  • pumpkin bread
  • pumpkin pie (my mom did this before I arrived, but I imagine her recipe is pretty standard)
  • pumpkin cheese cake (I'll be getting this recipe soon!)
We will also be making:
  • cornbread broccoli rabe strata (recipe from the New York Times; we're making half a recipe, and baking it in a square pan.)
  • sweet potatoes two ways: with marshmallows, and with lime syrup
  • a greek salad
  • cranberry-etrog sauce
  • apple-cranberry pie
  • pecan pie
If I'm forgetting anything, it's hard to tell. See why it's so hard to miss turkey with this thanksgiving feast?


Read more!

Saturday, November 17, 2007

The most interesting salad


This week at the farmers' market, I got lucky: I found two bags of greens left over from the previous week, labeled $1 each! One was pea shoots, and one was baby rainbow chard. I snagged 'em both and ran home to make something yummy.

I've never used pea shoots before; they're quite pretty. There are lots of small, round leaves, and little tendrils on the tip of each sprig. They also taste quite sweet, much like peas...


And rainbow chard, from what I can tell, is a prettier, more exciting version of baby spinach. The texture is similar, but the stems are colored red, orange and yellow.


I tossed a handful each of the two greens with other farmers' market finds: radishes, mushrooms, honeycrisp apples, and an extra-sharp cheddar. The honeycrisp apples are as their name suggests -- sweet-tart and extra crunchy. They go very well with sharp cheddar.


Since the cheddar was quite creamy, I wanted to keep the dressing light and tart. I settled on a dijon vinaigrette: equal parts lemon juice, dijon mustard, and blue agave syrup (can substitute brown sugar or other sweetener; see note below for details). I poured a stead stream of one part olive oil into the mix, stirring vigorously to emulsify, and poured the dressing over the salad.

Pea Shoots, baby rainbow chard, radishes, mushrooms, honeycrisp apples, sharp cheddar, dijon vinaigrette: how's that for a whimsical little salad?

Read more!

Thursday, November 15, 2007

T-Day at my house: vegetarians, stay tuned

I'm always surprised that people are such haters when it comes to veggie Thansgiving meals. "What? You don't have turkey? How dare!" say their astonished faces. Well, now you know: I don't care about turkey. It's dry almost every time I have it, and frankly, I'd rather a spring chicken any day. Plus, when you have two kinds of cornbread, two stuffings, four things that could easily qualify as mains, four or five cranberry sauces and chutneys and relishes, plus pecan pie, apple cranberry pie and pumpkin pie for dessert, turkey becomes an afterthought.

Anyway. I'm writing to all the vegetarians lurking in cyberspace who read my blog. Yes, you: stay tuned, because I'm going to my parents' house on Sunday to help mom cook, and I'll be taking the usual array of photos, notes and tastes....and, of course, sharing recipes. So keep reading, and I promise some fantastic T-day suggestions soon!

Also, a note to you carnivores who are hosting T-day yourself: veggies need to be looked after. If you don't think carefully, you'll end up with "bacon in the brussels sprouts, gravy on the mashed potatoes, dressing stuffed into the bird and chicken stock in everything else" (from Melissa Clark in NYT; I couldn't have said it better myself.) So do make sure that you have some completely vegetarian dishes at your table. For any and all suggestions...you know where to find me.
***picture above is pumpkin and delicata squash ravioli with brie. The recipe was nothing to write home about, but like I said -- more to follow.
Read more!

Wednesday, November 14, 2007

My quest for the perfect chocolate souffle


Three months of blogging and I actually have managed to not write about chocolate. It's really an embarrassment. Rarely does a day go by when I don't eat the stuff; how have I not blogged about a chocolate recipe yet??

Time to solve that.

Chocolate Souffle may be light and fluffy, but it's one of the richest ways to have your chocolate. When done properly, a delicate crust gives way to light but shockingly-rich innards, which deflate and melt on your tongue. Even better is when it's cut with straight cream at the table...ok, drooling.

I'll sing the praises of chocolate souffle forever, but finding the perfect recipe is proving to be a challenge. That's why this is the first in a series of posts, in which I'll try various recipes for chocolate souffle, rate them, and (hopefully) find or develop a foolproof recipe.

Recipe 1 comes from one of my favorite bloggers, Bea at La Tartine Gourmande. Her version calls for infusing the milk with fresh cardamom pods, which I love but don't have around the house, so I left them out. Here's the rundown:

Pros

  • the batter had a nice, light texture that stood up to a bit of over-mixing
  • the 20-25 minute cooking time was exactly right
  • the recipe called for equal numbers of yolks and whites, which means no egg-parts sitting in the fridge and a very happy Rivka :)
Cons
  • mine didn't rise to the heights that Bea's did. Who wants pouting souffles?
  • I used more chocolate than Bea called for, and my souffles were simply not chocolate-y enough. More chocolate more chocolate!
The search continues...

Read more!

NDP's Facelift


Welcome to the new and (hopefully) improved Not Derby Pie! I hope you like the new layout and scheme. Please leave comments with feedback -- I'm always looking for ways to improve (and attract more readers!)

Now, for an update on the life of NDP:
I've spent much of the last two months fretting and sweating over my new blog, http://www.notderbypie.com/. (Don't go check it out! It's a mess right now. :)) I've tried every available template, messed around with the layout to the best of my (minimal) ability, and even taught myself bits of HTML so that I could make the stupid, kitschy graphics on templates go away. All this, to no avail. I still can't find a template that I like. My preferences are actually pretty simple: I want a three-column split template with netural colors, some greens, good fonts, and general flexibility re: moving things around on the page. Sound simple? Think again.

If you or your friends or hey, your enemies -- I'll take anyone -- know HTML and are looking for an opportunity to be published and credited, a volunteer project, or a charity case (that's me!), please be in touch with me at RivkaFriedman(at)yahoo(dot)com. I could really use the talent and generosity of someone who knows what he/she's doing. Thanks so much, and I look forward to lots of feedback...
Read more!

Saturday, November 10, 2007

Spiced Pumpkin Bread


Quick-breads are a winter staple. I always make two at a time and stick one in the freezer; it's the perfect thing to pull out last-minute on a Friday afternoon and eat that night for dinner. As I understand it, a quick-bread is basically a of bread/cake that uses baking soda or powder as the main rising agent, instead of yeast. This means quick-breads do not need to rise for long periods of time -- hence quick-bread. yea.

While zucchini and carrot variations are both in my repertoire, pumpkin is my all-time favorite -- especially this version. My mom and I found this recipe on Epicurious a while back, and haven't tried a new one since. It's an oil-based recipe, so not only is it healthier than those butter-heavy pumpkin breads, it also develops a wonderful, sizable crust that most quick-breads don't have. (Check out the crust on this sucker!)

Other recipes call for cranberries and walnuts (this recipe lists walnuts as optional), but having made it with both and other things, I can tell you it's best just as is. It's the perfect "serve one, freeze one" treat.


Spiced Pumpkin Bread from Epicurious
makes 2 loaves

3 cups sugar
1 cup vegetable oil
3 large eggs
1 16-ounce can solid pack pumpkin
3 cups all purpose flour
1 teaspoon ground cloves
1 teaspoon ground cinnamon
1 teaspoon ground nutmeg
1 teaspoon baking soda
1/2 teaspoon salt
1/2 teaspoon baking powder
1 cup coarsely chopped walnuts (optional)

Preheat oven to 350°F. Butter and flour two 9x5x3-inch loaf pans. Beat sugar and oil in large bowl to blend. Mix in eggs and pumpkin. Sift flour, cloves, cinnamon, nutmeg, baking soda, salt and baking powder into another large bowl. Stir into pumpkin mixture in 2 additions. Mix in walnuts, if desired.

Divide batter equally between prepared pans. Bake until tester inserted into center comes out clean, about 1 hour 10 minutes. Transfer to racks and cool 10 minutes. Using sharp knife, cut around edge of loaves. Turn loaves out onto racks and cool completely.

Read more!

Thursday, November 8, 2007

Roasted Squash Seeds

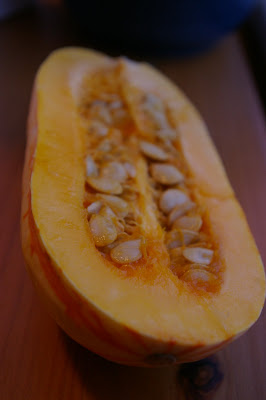
When I was young, squash seeds were a go-to fall snack in my house. They came in all shapes and sizes: butternut, acorn, delicata, pumpkin, etc. As soon as the weather was cool enough for squash, seeds would start to appear in Tupperware containers on the kitchen counter. As far as I remember, there was only one flavor: plain, with a bit of salt sprinkled on top.

Recently, I've started to get back into squash. Between weekly visits to the farmers' markets and a return to a mostly-vegetarian lifestyle, squash has once again become the staple that it was in my childhood. With all that delicata and butternut come a great many seeds, which, when roasted, are the perfect afternoon snack.

For flavors, just think about popcorn. I usually do mine in kettle-corn style: a bit of brown sugar, a bit of salt, maybe a dash of chili powder and cinnamon. I recently had zaatar-spiced seeds at my parents' house that were absolutely delicious, and I can imagine variations with Italian spices, garlic powder, pepper, honey, even chocolate. The possibilities are endless.

Once roasted, it's important to let the seeds cool before storing them -- otherwise they'll get soft. But let them cool completely, and they'll keep, stored in a tight plastic container, for about a month (if you can keep them around that long...)

Roasted Squash Seeds

However many squash seeds you have
cinnamon
chili powder
sugar
salt
pam or oil spray

Preheat oven to 300 degrees.

Spread seeds on a non-stick (pref.) baking sheet in a single layer. Spray them liberally with oil, and sprinkle salt and sugar on top till all seeds are coated. Finish with a few dashes or cinnamon and a dash of chili powder.

Roast in the 300-degree oven for about half and hour, until golden. Depending on your oven, you may want to raise the heat to 320. Take them out when they're golden and your house smells ridiculously yummy.

Let cool completely, then store in Tupperware containers for up to a month.

Read more!

Monday, November 5, 2007

Moroccan Couscous


I'll admit that I'm not such a couscous fan. When I was 15, my summer camp took us on a five-day hiking trip through the Berkshire mountains. We carried everything with us on our backs: water, tents and poles, food for five days, clothing, etc. Breakfast was PB&J or granola bars, since they were light; dinner, five days in a row, was couscous; and lunch every day was ... you guessed it: leftover couscous. I guess 10 nearly-consecutive meals of just couscous did the trick. These days, I tend to stick with rice.

Sometimes, though, I make tagine. Tagine is a moroccan stew in which, traditionally, the meat and/or vegetables are slow-cooked in a large shallow clay bowl with a tall conical top. Tagine is traditionally served atop couscous, so in a pinch, I do have a go-to couscous recipe, which I'll share here.

Couscous is very simple to make: if you buy one of those Near East boxes, it's as simple as bring the requisite amount of water to a boil, adding the couscous, covering the pot, turning off the heat, and fluffling it with a fork five minutes later. I change things around, since the last thing I want is some boring couscous for dinner. Try this with a tagine recipe, or even as an accompaniment to tonight's veggies.

Moroccan Couscous (corrections appended)

serves 6-8.

1 box couscous
1 cup dried apricots, chopped
1 cup dried raisins
1/2 cup orange juice, substituted for 1/2 cup of the water called for in the recipe.
1 tsp. salt
1 tsp. cinnamon
1/2 tsp. nutmeg
1/2 tsp. cloves
1/8 tsp. star anise (optional)
1/4 tsp. powdered ginger (optional)
1/2 tsp. turmeric
a dash of olive oil

(If you don't have any of these ingredients, it's fine to go without. For example, the batch pictured above was made without anise, turmeric or cloves.)

For the fruit:

Bring 1/2 cup water to a boil. When it reaches a boil, pour it over the dried apricots and raisins in a small bowl. Allow this to sit for at least 15 minutes; this will reconstitute your fruit, making them plump and juicy. When 15 minutes have passed, do not spill out the water! Use it as part of the cooking liquid for the couscous.

For the couscous:

Bring two cups of liquid to a boil. I usually use 1/2 cup orange juice, and occasionally 1/2 cup white wine, and the rest either water or broth. Add all the other spices and ingredients to the pot as the liquid heats. When the liquid is boiling, add 2 cups of couscous. stir quickly, cover the pot, and turn off the heat. Let the couscous steam for 5 minutes, then uncover and fluff with a fork.

Add the dried apricots and raisins, and toss. Serve with almost anything.
Read more!